The Funtoo Linux project has transitioned to "Hobby Mode" and this wiki is now read-only.
Difference between revisions of "Windows 10 Virtualization with KVM"
(-cpu host causes latest Windows 10 to die on install.) |
|||
| Line 120: | Line 120: | ||
Our {{c|vm.sh}} by default enables built-in Samba support to allow easy access to files in your home directory. To enable this capability, type {{c|\\10.0.2.4\qemu}} in the Windows 10 search bar, and hit Enter. Windows should prompt you to create a network drive to this path. Do so, mapping it to drive Z, and click OK. You should now be able to access your Linux home directory as drive Z. | Our {{c|vm.sh}} by default enables built-in Samba support to allow easy access to files in your home directory. To enable this capability, type {{c|\\10.0.2.4\qemu}} in the Windows 10 search bar, and hit Enter. Windows should prompt you to create a network drive to this path. Do so, mapping it to drive Z, and click OK. You should now be able to access your Linux home directory as drive Z. | ||
In newer versions of windows, guest authentication fallback for file shares is blocked according to https://support.microsoft.com/en-us/help/4046019/guest-access-in-smb2-disabled-by-default-in-windows-10-and-windows-ser . | |||
From the support link, this can be bypassed by navigating to the following group policy setting and enabling it. | |||
{{c|Computer Configuration\Administrative Templates\Network\Lanman Workstation | |||
"Enable insecure guest logons"}} | |||
== SPICE (Accelerated Remote Connection) == | == SPICE (Accelerated Remote Connection) == | ||
Revision as of 01:03, March 30, 2020
This page describes how to set up Funtoo Linux to run Windows 10 Home/Professional 64-bit within a KVM virtual machine. KVM is suitable for running Windows 10 for general desktop application use. It does not provide 3D support, but offers a nice, high-performance virtualization solution for day-to-day productivity applications. It is also very easy to set up.
While this page provides a good introduction to how to run Windows 10 with Linux KVM, some parts of these instructions are specific to Funtoo Linux. They may need to be adapted somewhat for other Linux distributions. But we are happy to have this page be a good general resource for Windows 10 under KVM for all Linux distros. If you have adaptations to the docs for other Linux distributions, please feel free leaving the steps at the talk page and we'll consider adding them.
Introduction
KVM is a hardware-accelerated full-machine hypervisor and virtualization solution included as part of kernel 2.6.20 and later. It allows you to create and start hardware-accelerated virtual machines under Linux using the QEMU tools.
KVM Setup
You will need KVM to be set up on the machine that will be running the virtual machine. This can be a local Linux system, or if you are using SPICE (see SPICE), a local or remote system. See the SPICE section for tweaks that you will need to make to these instructions if you plan to run Windows 10 on a Funtoo Linux system that you will connect to remotely.
Follow these steps for the system that will be running the virtual machine.
If you are using an automatically-built kernel, it is likely that kernel support for KVM is already available.
If you build your kernel from scratch, please see the KVM page for detailed instructions on how to enable KVM. These instructions also cover the process of emerging qemu, which is also necessary. Do this first, as described on the KVM page -- then come back here.
Before using KVM, be sure that your user account is in the kvm group so that qemu can access /dev/kvm. You will need to use a command such as vigr as root to do this, and then log out and log back in for this to take effect.
Prior to using KVM, modprobe the appropriate accelerated driver for Intel or AMD, as root:
root # modprobe kvm_intel
Windows 10 ISO Images
In this tutorial, we are going to install Windows 10 Home, 64-bit Edition. Microsoft provides a free download of the ISO DVD image, but this does require a valid license key for installation. You can download the ISO at the following location:
https://www.microsoft.com/en-us/software-download/windows10ISO
Windows 10 is a free download but requires a valid license key for installation.
In addition, it's highly recommended that you download "VirtIO" drivers produced by Red Hat. These drivers are installed under Windows and significantly improve Windows 7 network and disk performance. You want to download the ISO file (not the ZIP file) at the following location:
https://fedorapeople.org/groups/virt/virtio-win/direct-downloads/latest-virtio/
At the time of this writing, the latest version of the virtio ISO is virtio-win-0.1.149.iso
Create Raw Disk
In this tutorial, we are going to create a 30GB raw disk image for Windows 7. Raw disk images offer better performance than the commonly-used QCOW2 format. Do this as a regular user:
user $ cd
user $ mkdir vm
user $ cd vm
user $ qemu-img create -f raw win10.img 30G
We now have an empty virtual disk image called win10.img in our home directory.
QEMU script
Now, we'll create the following script to start our virtual machine and begin Windows 10 installation. Note that this script assumes that the two ISO files downloaded earlier were placed in the vm directory we created. Adjust paths as necessary if that is not the case. Also be sure to adjust the following parts of the script:
- Adjust the name of VIRTIMG to match the exact name of the VirtIO ISO image you downloaded earlier
- Adjust the smp option to use the number of CPU cores and threads (if your system has hyperthreading) of your Linux system's CPU.
- Adjust memory allocated to the VM to be a fraction of your system's RAM (currently 6GB via
-m 6144setting)
Use your favorite text editor to create the following script. Name it something like vm.sh:
#!/bin/sh
WINIMG=~/vm/Win10_1803_English_x64.iso
VIRTIMG=~/vm/virtio-win-0.1.149.iso
qemu-system-x86_64 --enable-kvm -drive driver=raw,file=~/vm/win10.img,if=virtio -m 6144 \
-net nic,model=virtio -net user -cdrom ${WINIMG} \
-drive file=${VIRTIMG},index=3,media=cdrom \
-rtc base=localtime,clock=host -smp cores=4,threads=8 \
-usb -device usb-tablet \
-net user,smb=$HOME
Now, make the script executable:
user $ chmod +x vm.sh
Here is a brief summary of what the script does. It starts the qemu-kvm program and instructs it to use KVM to accelerate virtualization. The display will be shown locally, in a window. If you are using the SPICE method, described later in this document, no window will appear, and you will be able to connect remotely to your running virtual machine.
The system disk is the 30GB raw image you created, and we tell QEMU to use "virtio" mode for this disk, as well as "virtio" for network access. This will require that we install special drivers during installation to access the disk and enable networking, but will give us better performance.
To assist us in installing the VirtIO drivers, we have configured the system with two DVD drives -- the first holds the Windows 7 installation media, and the second contains the VirtIO driver ISO that we will need to access during Windows 10 installation.
The -usb -device usb-tablet option will cause our mouse and keyboard interaction with our virtual environment to be intuitive and easy to use.
For optimal performance, adjust the script so that the -smp option specifies the exact number of cores and threads on your system -- on non-HyperThreading systems (AMD and some Intel), simply remove the ,threads=X option entirely and just specify cores. Also ensure that the -m option provides enough RAM for Windows 10, without eating up all your system's RAM. On a 4GB Linux system, use 1536. For an 8GB system, 2048 is safe. 6144 is ideal if you have 16GB+ of Linux RAM.
Installation of Windows 10
To begin installation, run the script:
user $ ./vm.sh
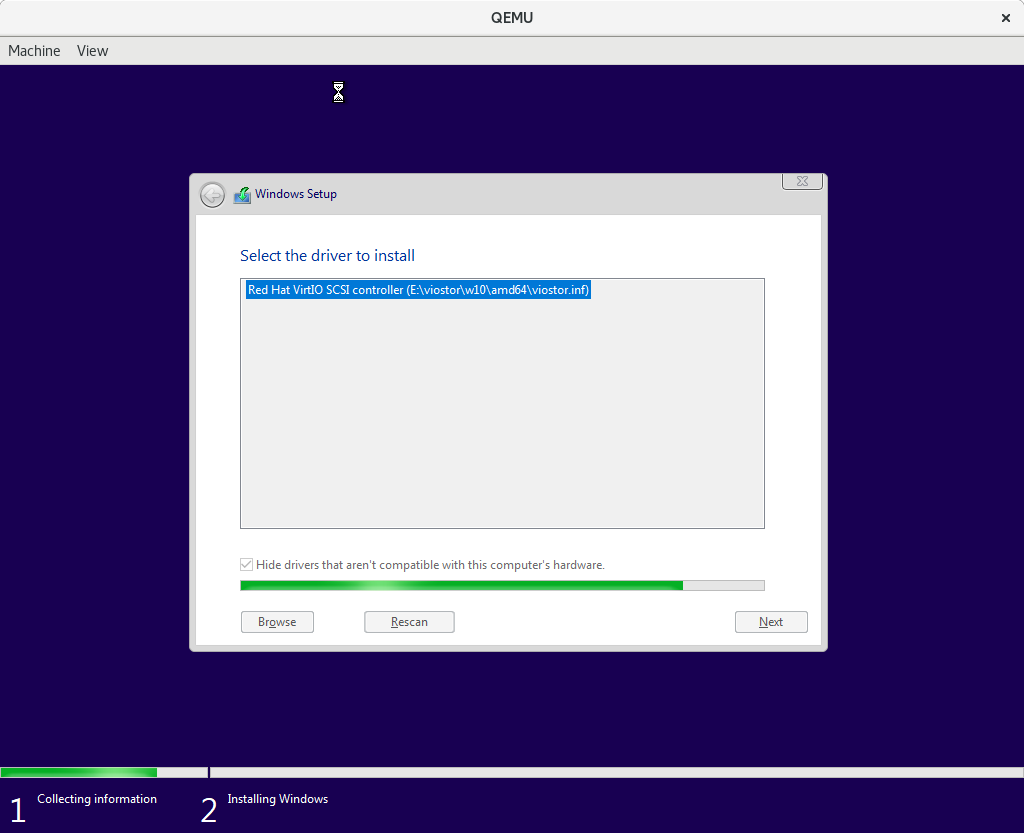
The Windows 10 ISO image will boot and installation will begin. Everything should proceed as expected for a Windows 10 installation until the point where you need to select a destination disk. Since we are using the virtio driver, we will need to manually load this driver so that the 30GB disk image is visible for installation.
To do this, you will see an option to manually install a driver. Select this option, and navigate to the Red Hat virtio ISO (available under your Windows VM) and to the E:\viostor\w10\amd64 directory. After selecting this directory, the Windows 10 installer will spend a minute or two configuring the driver, after which you should be able to see 30 GB of free storage available for Windows installation. Proceed with the installation process as normal.
Installation of Network Drivers
Once Windows 10 installation has completed, you will notice that although Windows is installed, no network or sound is available. We will not cover enabling sound in this document, as sound support in qemu is choppy by default (whether using alsa or pulseaudio) and really deserves its own document for proper configuration since it's so tricky to get perfect. But networking is essential, and we will want to your VM on the network.
To do this, open Device Manager in Windows and select the network adapter, and right-click on it and choose Update Driver. Then navigate to the virtio CD, path E:\NetKVM\w10\amd64 and install the driver. Your network will now be enabled.
Accessing Files on your Linux System
Our vm.sh by default enables built-in Samba support to allow easy access to files in your home directory. To enable this capability, type \\10.0.2.4\qemu in the Windows 10 search bar, and hit Enter. Windows should prompt you to create a network drive to this path. Do so, mapping it to drive Z, and click OK. You should now be able to access your Linux home directory as drive Z.
In newer versions of windows, guest authentication fallback for file shares is blocked according to https://support.microsoft.com/en-us/help/4046019/guest-access-in-smb2-disabled-by-default-in-windows-10-and-windows-ser .
From the support link, this can be bypassed by navigating to the following group policy setting and enabling it.
Computer Configuration\Administrative Templates\Network\Lanman Workstation
"Enable insecure guest logons"
SPICE (Accelerated Remote Connection)
SPICE is a new technology that has been incorporated into QEMU, which allows the virtual machine to run on one system, and allows you to use spicy, the SPICE client, to connect to your remote virtual machine. In real-world use, you can run a SPICE server (via QEMU) and client on the same machine if you like, or have them on the same local area network, or have server and client connect over an Internet connection. Here are some important facts about SPICE:
- SPICE provides accelerated, optimized video updates over the network, similar to VNC
- QEMU can be configured to run a SPICE server, which you can connect to via
spicy, the SPICE client. The SPICE client renders to a local window on your system. - SPICE allows easy copying and pasting across operating systems -- for example, you can copy something in GNOME, paste it into the
spicywindow and have it appear on your Windows 7 system.
SPICE Setup
To set up SPICE, you need to perform the following changes to the "standard" steps described in this document:
- Emerge QEMU with the
spiceUSE variable on the system that will be running the Windows 7 virtual machine. - Emerge
app-emulation/virt-vieweron the system that you will be using to connect to your remote Windows 7 virtual machine. - In the
vm.shscript, remove the existing-vga vmwareqemu-kvmoption, and add these options:-vga qxl -device virtio-serial-pci -spice port=5900,password=mypass -device virtserialport,chardev=spicechannel0,name=com.redhat.spice.0 -chardev spicevmc,id=spicechannel0,name=vdagent - Run
vm.shas described in the next section on your remote server (your Windows 7 system will now boot, but you can't see the virtual machine display) and then connect to it by running the following command on your local system:
root # spicy -h remotehost -p 5900 -w mypass
The SPICE client window will appear locally and allow you to interact with your Windows 7 system.
Browse all our available articles below. Use the search field to search for topics and keywords in real-time.

