The Funtoo Linux project has transitioned to "Hobby Mode" and this wiki is now read-only.
Open vSwitch
Open vSwitch
Open vSwitch is a production quality, multilayer virtual switch licensed under the open source Apache 2.0 license. It is designed to enable massive network automation through programmatic extension, while still supporting standard management interfaces and protocols (e.g. NetFlow, sFlow, SPAN, RSPAN, CLI, LACP, 802.1ag). In addition, it is designed to support distribution across multiple physical servers similar to VMware's vNetwork distributed vswitch or Cisco's Nexus 1000V.
Features
The current stablerelease of Open vSwitch (version 1.4.0) supports the following features:
- Visibility into inter-VM communication via NetFlow, sFlow(R), SPAN, RSPAN, and GRE-tunneled mirrors
- LACP (IEEE 802.1AX-2008)
- Standard 802.1Q VLAN model with trunking
- A subset of 802.1ag CCM link monitoring
- STP (IEEE 802.1D-1998)
- Fine-grained min/max rate QoS
- Support for HFSC qdisc
- Per VM interface traffic policing
- NIC bonding with source-MAC load balancing, active backup, and L4 hashing
- OpenFlow protocol support (including many extensions for virtualization)
- IPv6 support
- Multiple tunneling protocols (Ethernet over GRE, CAPWAP, IPsec, GRE over IPsec)
- Remote configuration protocol with local python bindings
- Compatibility layer for the Linux bridging code
- Kernel and user-space forwarding engine options
- Multi-table forwarding pipeline with flow-caching engine
- Forwarding layer abstraction to ease porting to new software and hardware platforms
Configuring Open vSwitch
Open vSwitch needs to be compiled with the kernel modules (modules USE flag) for kernel versions <3.3, since 3.3.0 it is included in the kernel as a module named "Open vSwitch" and can be found in kernel at Networking Support -> Networking Options -> Open vSwitch. Then just emerge openvswitch with
# emerge -avt openvswitch
Using Open vSwitch
These Configs are taken from the Open vSwitch website at http://openvswitch.org and adjusted to funtoo's needs
VLANs
Setup
- Two Physical Networks
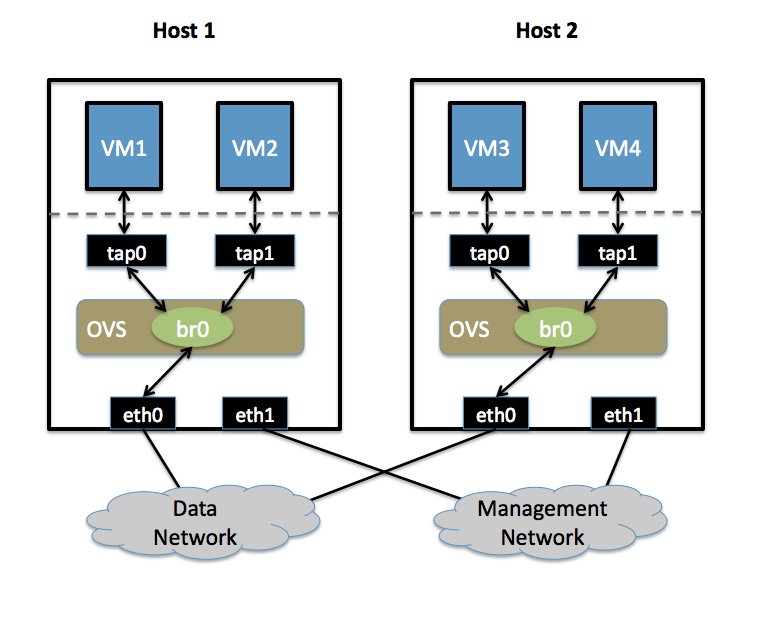
- Data Network: Eternet network for VM data traffic, which will carry VLAN tagged traffic between VMs. Your physical switch(es) must be capable of forwarding VLAN tagged traffic and the physical switch ports should be VLAN trunks (Usually this is default behavior. Configuring your physical switching hardware is beyond the scope of this document).
- Management Network: This network is not strictly required, but it is a simple way to give the physical host an IP address for remote access, since an IP address cannot be assigned directly to eth0.
- Two Physical Hosts
Host1, Host2. Both hosts are running Open vSwitch. Each host has two NICs:
- eth0 is connected to the Data Network. No IP address can be assigned on eth0
- eth1 is connected to the Management Network (if necessary). eth1 has an IP address that is used to reach the physical host for management.
- Four VMs
VM1, VM2 run on Host1. VM3, VM4 run on Host2.
Each VM has a single interface that appears as a Linux device (e.g., "tap0") on the physical host. (Note: for Xen/XenServer, VM interfaces appear as Linux devices with names like "vif1.0").

Goal
Isolate VMs using VLANs on the Data Network. VLAN1: VM1, VM3 VLAN2: VM2, VM4
Configuration
Perform the following configuration on Host1:
- Create an OVS bridge
ovs-vsctl add-br br0
- Add eth0 to the bridge (by default, all OVS ports are VLAN trunks, so eth0 will pass all VLANs)
ovs-vsctl add-port br0 eth0
- Add VM1 as an "access port" on VLAN1
ovs-vsctl add-port br0 tap0 tag=1
- Add VM2 on VLAN2
ovs-vsctl add-port br0 tap0 tag=2
On Host2, repeat the same configuration to setup a bridge with eth0 as a trunk
ovs-vsctl add-br br0
ovs-vsctl add-port br0 eth0
- Add VM3 to VLAN1
ovs-vsctl add-port br0 tap0 tag=1
- Add VM4 to VLAN2
ovs-vsctl add-port br0 tap0 tag=2
sFlow
This will setup a VM traffic Monitor using sFlow.
Setup
- Two Physical Networks
- Data Network: Eternet network for VM data traffic.
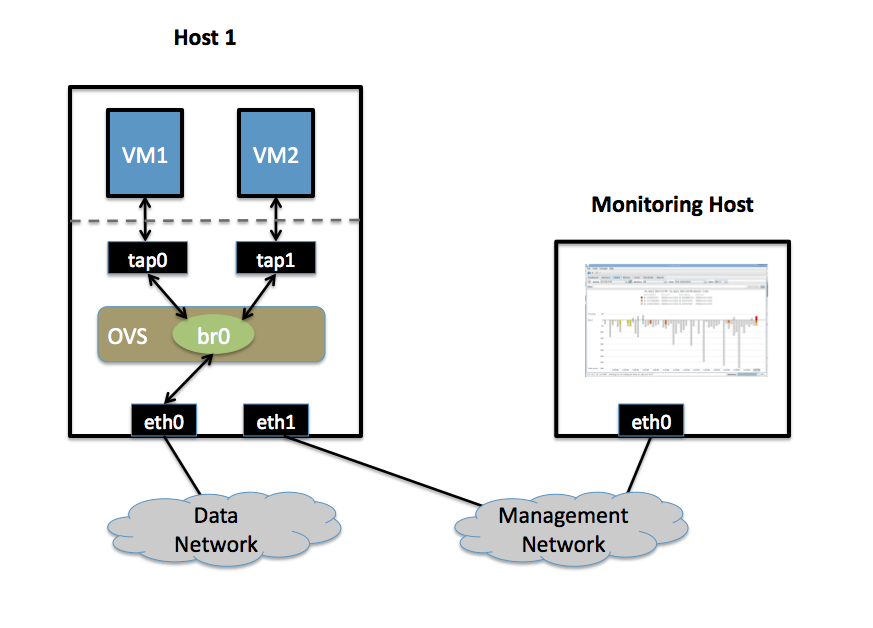
- Management Network: This network must exist, as it is used to send sFlow data from the agent to the remote collector.
- Two Physical Hosts
- Host1 runs Open vSwitch and has two NICs:
- eth0 is connected to the Data Network. No IP address can be assigned on eth0.
- eth1 is connected to the Management Network. eth1 has an IP address for management traffic (including sFlow).
- Monitoring Host can be any computer that run the sFlow collector. Here we use sFlowTrend, a free sFlow collector, a simple cross-platform Java tool. Other sFlow collectors should work equally well.
- eth0 is connected to the Management Netowrk: eth0 has an IP address that can reach Host1.
- Host1 runs Open vSwitch and has two NICs:
- Two VMs
VM1, VM2 run on Host1. Each VM has a single interface that appears as a Linux device (e.g., "tap0") on the physical host. (Note: same for Xen/XenServer as in the VLANs section.)

Goal
Monitor traffic sent to/from VM1 and VM2 on the Data network using an sFlow collector.
Configuration
Define the following configuration values in your shell environment. The default port for sFlowTrend is 6343. You will want to set your own IP address for the collector in the place of 10.0.0.1. Setting the AGENT_IP value to eth1 indicates that the sFlow agent should send traffic from eth1's IP address. The other values indicate settings regarding the frequency and type of packet sampling that sFlow should perform.
# export COLLECTOR_IP=10.0.0.1
# export COLLECTOR_PORT=6343
# export AGENT_IP=eth1
# export HEADER_BYTES=128
# export SAMPLING_N=64
# export POLLING_SECS=10
Run the following command to create an sFlow configuration and attach it to bridge br0:
ovs-vsctl -- -id=@sflow create sflow agent=${AGENT_IP} target=\”${COLLECTOR_IP}:${COLLECTOR_PORT}\” header=${HEADER_BYTES} sampling=${SAMPLING_N} polling=${POLLING_SECS} — set bridge br0 sflow=@sflow
That is all. To configure sFlow on additional bridges, just replace "br0" in the above command with a different bridge name. To remove sFlow configuration from a bridge (in this case, 'br0'), run:
ovs-vsctl remove bridge br0 sflow $SFLOWUUID
To see all current sets of sFlow configuration parameters, run:
ovs-vsctl list sflow